 SPArk Sequencer

Introduction
Toolset to improve the sequence workflow in Blender. This add-on is a fork of https://github.com/The-SPA-Studios/sequencer-addon. It contains a set of tools that improve the sequence workflow in Blender. It can be used for Storyboarding or Layout, to work simultaneously on different shots, leveraging Blender's native concepts of scenes and cameras, as well as the Video Sequence Editor (VSE).
Your first shot
A shot is a container that points to a specific camera at a specific time in your blender scene. A sequence is composed of multiple shots, pointing to multiple cameras. Each camera can be used at different points in time, some cameras are reused multiple times.
Shots are used to edit a sequence based on the action in your scene. Use Blender's Sequencer to add a new shot. To get started from the Sequencer header Menu find Shot > New. For more detail on how to add Shots see Understanding Shots
Editing Toolbar
The toolbar can be found by hitting T on your keyboard or navigating to View>Toolbar in the toolbar you can find the selection tool and the blade tool.

Load Reference Video into Sequencer
- Move your sequence clips up to the second channel by using Y and moving your mouse upwards.
- Create a new Movie clip by going to Add>Movie
- You can select a channel in the loader settings on the Right side of the pop up
- Your reference is now in the sequence
- View your reference in the same area as your sequencer by enabling View>Preview as Background
Switching a Shots Camera
Each shot in the sequencer is linked to a scene and a camera. You can see a list of these shots and their corresponding data under the sequencer panel. This is a comprehensive list of all the shots in your edit, the highlighted shot being the active shot on the current frame.
When a shot is highlighted its properties become available to modify; scene, camera and focal length. For example if you want to change the camera assigned to SH0010, navigate to the shot SH0010 in the sequencer. Find the Layout>Sequence side panel. Select a new camera from the Camera dropdown menu.

Rendering your Sequence
Rendering is the process of exporting the final frames of animation from the editing area into either Movie or Image files. This rendering workflow allows simple batch rendering of all or selected shots in the Sequencer. The render area allows for playback of the rendered images.
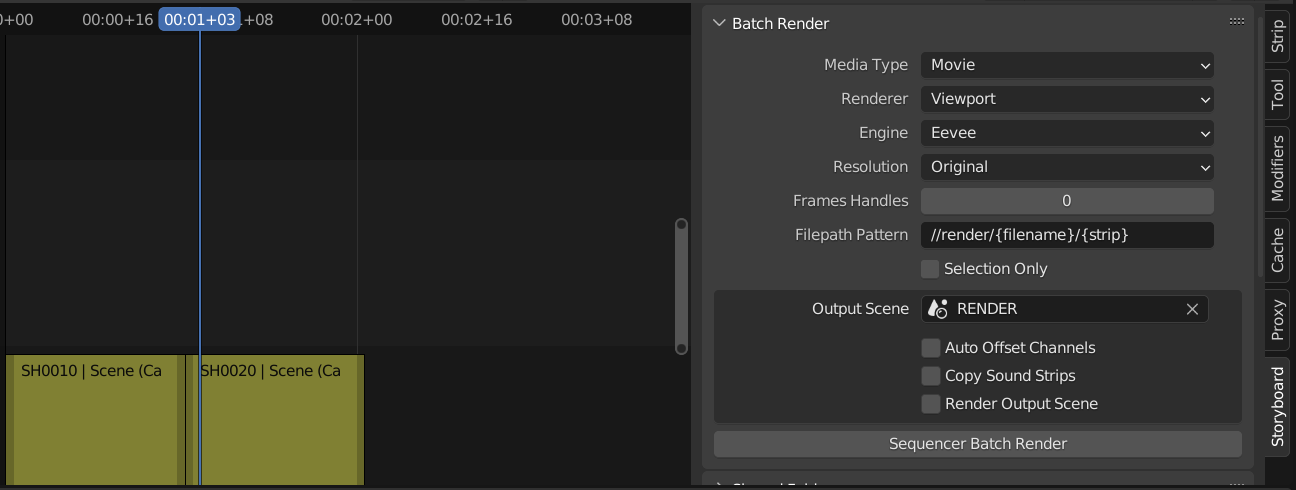
- Navigate to the Sequencer>Storyboarding Panel in Editing area
- Set the following settings under Batch Render:
- Set media type: Images or Movie. This will define the output file type.
- Renderer: Viewport=Faster Internal=Standard Render Engine
- OutputScene: This output is usually RENDER or SEQ Render
- File Pattern: output to a folder called render at the location of the blend file
- Selection Only: only render highlighted clips from the sequencer.
- Select Sequencer Batch Render to begin rendering
- Once complete the user will see the completed files in the Render area tab
Editing & Rendering
Understanding shots
A Previz sequence can be composed of a single "shot" or multiple "shots".
A shot is a container that points to a specific camera at a specific time in your blender scene. A sequence is composed of multiple shots, pointing to multiple cameras. Each camera can be used at different points in time, some cameras are reused multiple times.
Shots are used to edit a sequence based on the action in your scene. Use Blender's Sequencer to add a new shot. To get started from the Sequencer header Menu find Shot > New. For more detail on how to add Shots see Managing Shots

In most cases during Previz a Blend file will contain one Scene where all action occurs, any shots in the sequence will point to this same Existing Scene. In this case each shot or strip represents both a 'Camera' and 'a point in time' within an existing scene.
Shots can also point to a different Blender Scene. Shots that point to different scenes is an advanced topic, covered later in the document. See Switch a Shot's Scene for more information
Navigating Between Shots
The 3D Viewport and Dope Sheet timeline interfaces can be synchronized with the master play-head from the Sequencer. When scrubbing from scene to scene in the sequencer, the corresponding scene content will be shown into the 3D Viewport and Dope Sheet.
Pay attention to the difference in behavior between scrubbing or using arrow keys in each area (Dope Sheet or Sequencer)
Using the Sequencer scrub or play to navigate between shots.

Using the Dope Sheet, navigating frame by frame with the arrow keys, the next shot will load after the final frame. (only frame by frame not scrubbing)
Using the Dope Sheet scrub the timeline to remain in that current camera's view. (only scrubbing not frame by frame)
Switch a Shot's Camera
Each shot in the sequencer is linked to a scene and a camera. You can see a list of these shots and their corresponding data under the sequencer panel. This is a comprehensive list of all the shots in your edit, the highlighted shot being the active shot on the current frame.
When a shot is highlighted its properties become available to modify; scene, camera and focal length. For example if you want to change the camera assigned to SH0010, navigate to the shot SH0010 in the sequencer. Find the Layout>Sequence side panel. Select a new camera from the Camera dropdown menu.
Switch a Shot's Scene
In the Layout>Sequence panel there is a list of all Shots and their corresponding scenes/cameras described in Switching Shot's Camera. When a shot is highlighted it's scene can be edited. Navigate to the shot you want to change in the sequencer. Inside the Layout>Sequence side panel. Select a new scene from the Scene dropdown menu. See the Blender Manual for more information on scenes.
Add, Remove and Manage Shots
New Shots
To add a shot select Shot New from the Sequencer Header Menu. Update the shot number, in most cases shots will be derived from the Existing scene.

- Shot Name Set a Prefix/Number/Take: Use
 to get the next available shot name
 - Scene: Use existing (most cases) or create a new scene from a Template
- Source: Available scenes + templates: (more about 2D templates TBD)
- Duration - Set the duration in frames
- Channel - Select a row (aka channel) to place this new clip on, in the Sequencer
Duplicate Shot
When Duplicating a shot, the selected contents are appended to the end of your timeline, this also means that these clips are shifted in the Dope Sheet. To duplicate a shot without adjusting its timing in the Scene world use Shift + D.
Delete Shot
Each shot is associated with a scene. To delete a shot normally simply select Shot>Delete and leave Delete Scenes unchecked or hit 'X' on the keyboard. To remove a shot and the associated scene use Shot>Delete and check the Delete Scenes option.
Warning: Delete Scenes option will remove associated Scene data from the outliner.
Adjust Shot's Timing
Adjust timing will change the length of a strip in the sequencer and in the Dope Sheet. Adjust Timing affects only one clip at a time. To adjust timing of multiple shots at the same time see Roll an Edit
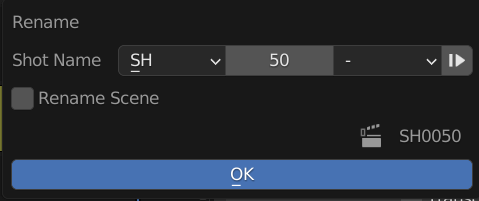
Rename a Shot
To rename a shot use Shot>Rename. This will work on a single shot at a time, use the  to get the next available shot number. Check the rename scene to also rename the scene associated with this strip.
Rename All Shots
After editing your shot names may be out of order. To reset the numbering of all shots use Shot>Cleanup>Chronological Numbering. This will rename all shots based on the specified naming convention. Scenes can also be renamed by selecting a scene rename policy.
Refining your Edit
Using the Editing Workspace, refinements can be made to edit using Blender's Sequencer. The Editing area can be used to refine your edit and add effects/transitions as needed.
Before you begin ensure you have the Editing Workspace selected from the header.
Edit a Shot's Duration
Dope Sheet: Select one of the frame handles at the bottom of the Grease Pencil timeline and drag.
Sequencer: Select a frame handle with a mouse. Hit 'G' on the keyboard, move the mouse.
Slipping a shot
A slip edit means adjusting the in and out points of a clip simultaneously by the same amount in the same direction keeping the total duration of the clip the same. The clips start and end points within the Dope Sheet will change, but not on the sequencer.
From the Dope Sheet select the handle on top of the clip and drag.
Roll an edit
A roll edit adjusts the start point and the endpoint of two adjacent clips simultaneously. Do this if you want to move an edit and also adjust the shot's timing in the Dope Sheet.
Render your Sequence
Rendering is the process of exporting the final frames of animation from the editing area into either Movie or Image files. This rendering workflow allows simple batch rendering of all or selected shots in the Sequencer. The render area allows for playback of the rendered images.
- Navigate to the Sequencer>Storyboarding Panel in Editing area
- Set the following settings under Batch Render:
- Set media type: Images or Movie. This will define the output file type.
- Renderer: Viewport=Faster Internal=Standard Render Engine
- OutputScene: This output is usually RENDER or SEQ Render
- File Pattern: output to a folder called render at the location of the blend file
- Selection Only: only render highlighted clips from the sequencer.
- Select Sequencer Batch Render to begin rendering
- Once complete the user will see the completed files in the Render area tab
What's New
0.1.6 February 19th, 2026
Changes:
- Fix API Changes in Blender 5.0
- Maintains compatibility with Blender 4.5
- Disables "Sync Scene Time" Feature when using SPArk Sync. Due to bugs in Blender 5.0. See Issue List for details
Full Release Notes on Github
Planned Future Features:
- Integration with "Sync Scene Time"
- Import Image Sequence as single clip in Render Scene
- Jump Strips from Viewport Shortcut
- Overwrite / Placeholder Support added to Render Options
- Select & Duplicate Camera Buttons
See progress on new features on Github.
This is amazing! I love how the spa build of blender worked and I am glad to see 1 part of it in current blender.
Simply amazing