 Control Render Regions

A Blender Addon to manage renders with Render Region, mainly to launch renders from the terminal.
Works with two methods, "divide" or "multiply": "divide" divides the render into regions and allows you to render all regions or just some; with the "multiply" method the render resolution is multiplied by the indicated value and the render is divided into regions, all with the original resolution.
Useful in several cases, for example:
- Likelihood or need to interrupt very long renderings (computer availability problems, risk of power outages).
- Divide the rendering of the same image between multiple computers, assigning different regions to each computer
- Manage complex scenes/heavy renders.
- Rendering very large images.
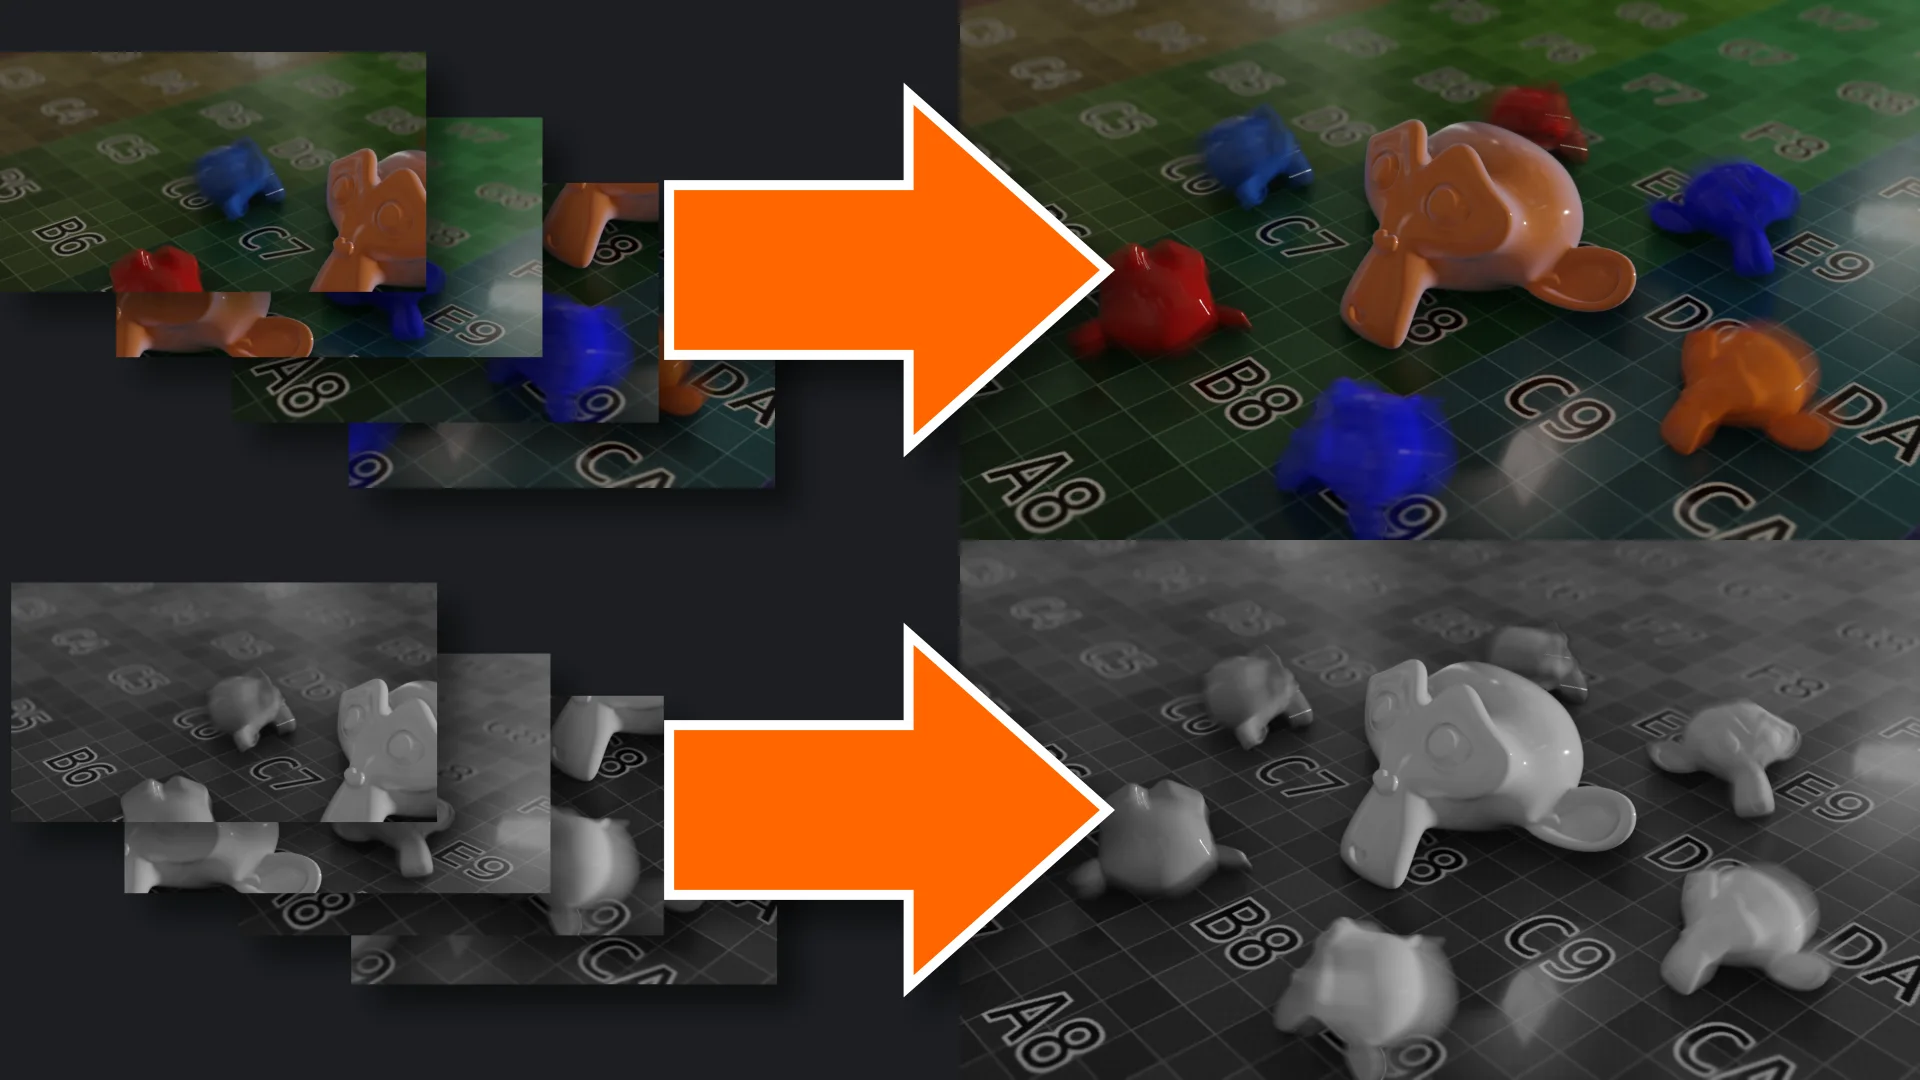
To merge all images from the script created by this addon, OpenImageIO, Pillow or Imagemagick and Python3 must be installed on the system where the scripts will be launched, see 'Required software and OpenEXR Multilayer compatibility' at the bottom of this description.
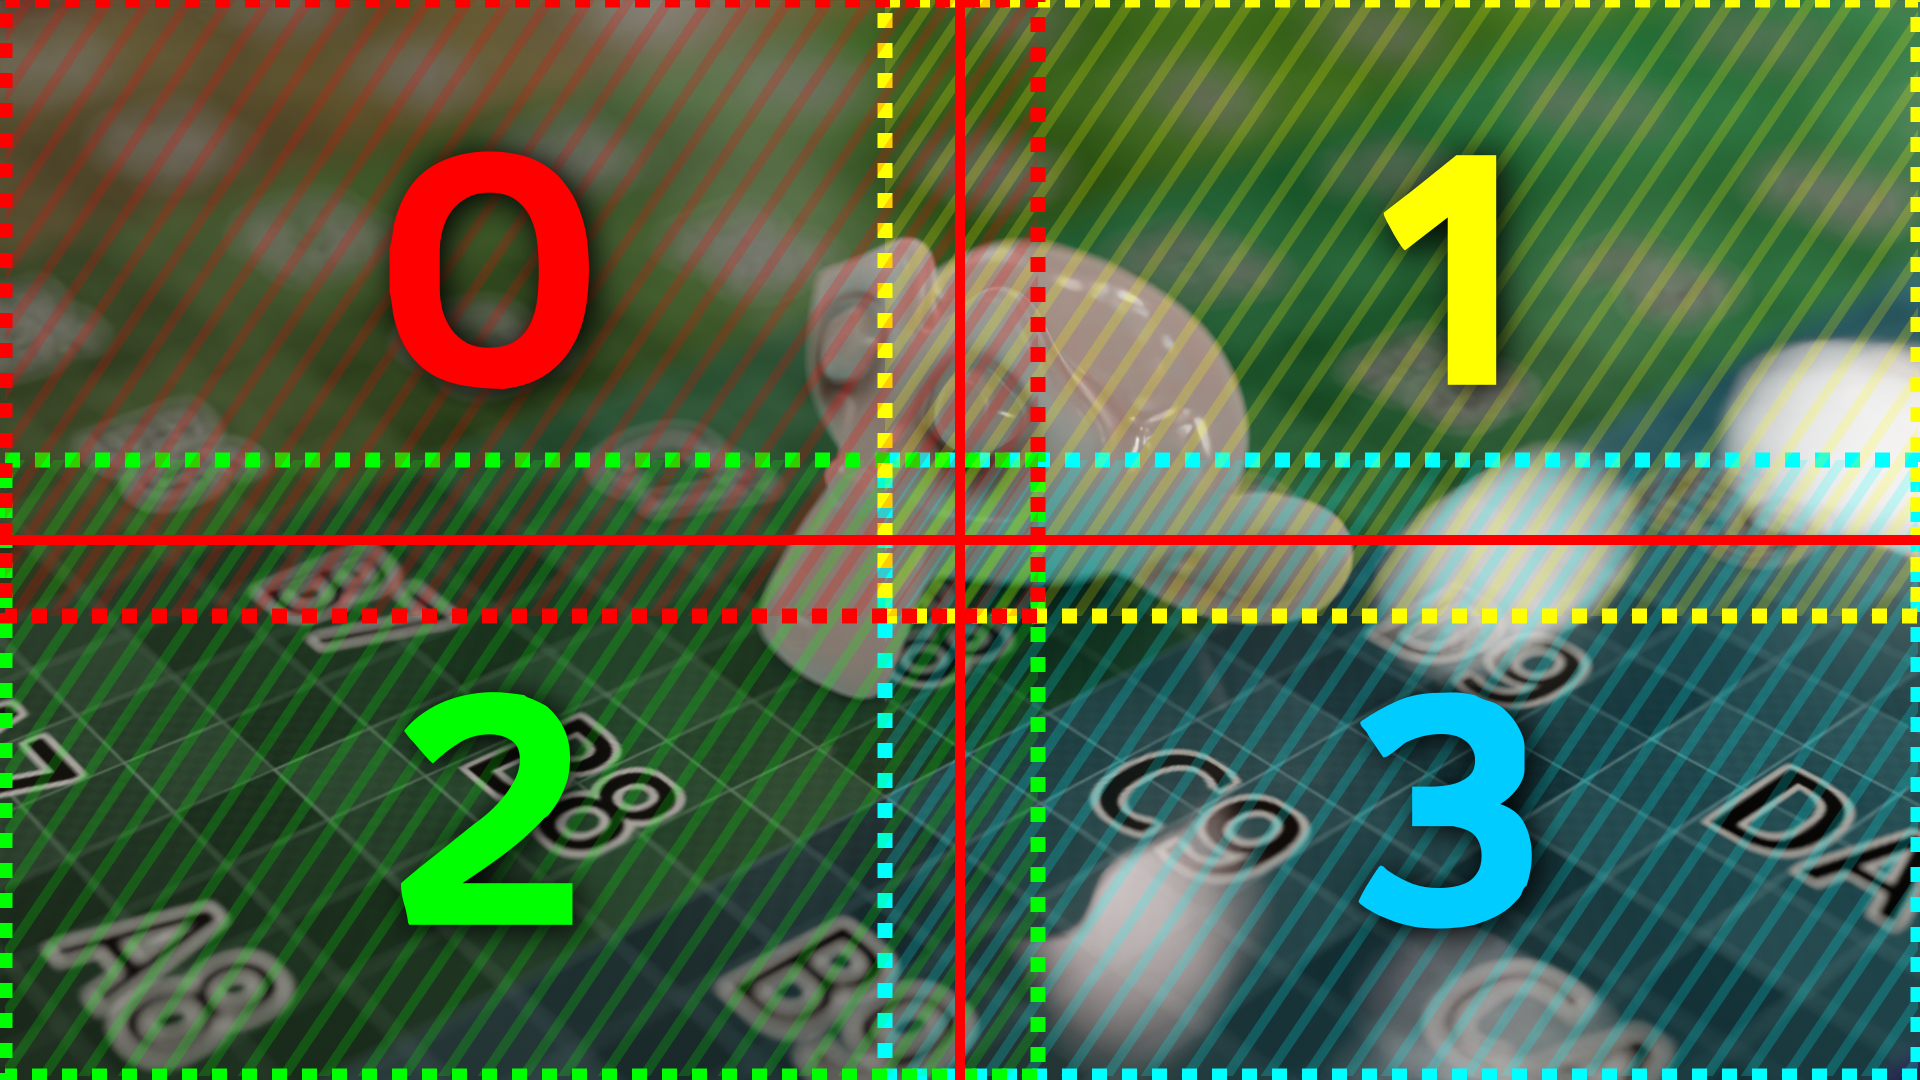
The regions are rendered top to bottom left to right, so the first one will be the top left and the last one will be the bottom right.
You can add margins to regions to have overlapping areas: this way you can avoid problems due to denoise in cycles or effects in the compositor, for example "glare", when merging regions.
Tested with Cycles and Eevee with Blender 4.2.0, in Ubuntu 24.04 and Windows 10.
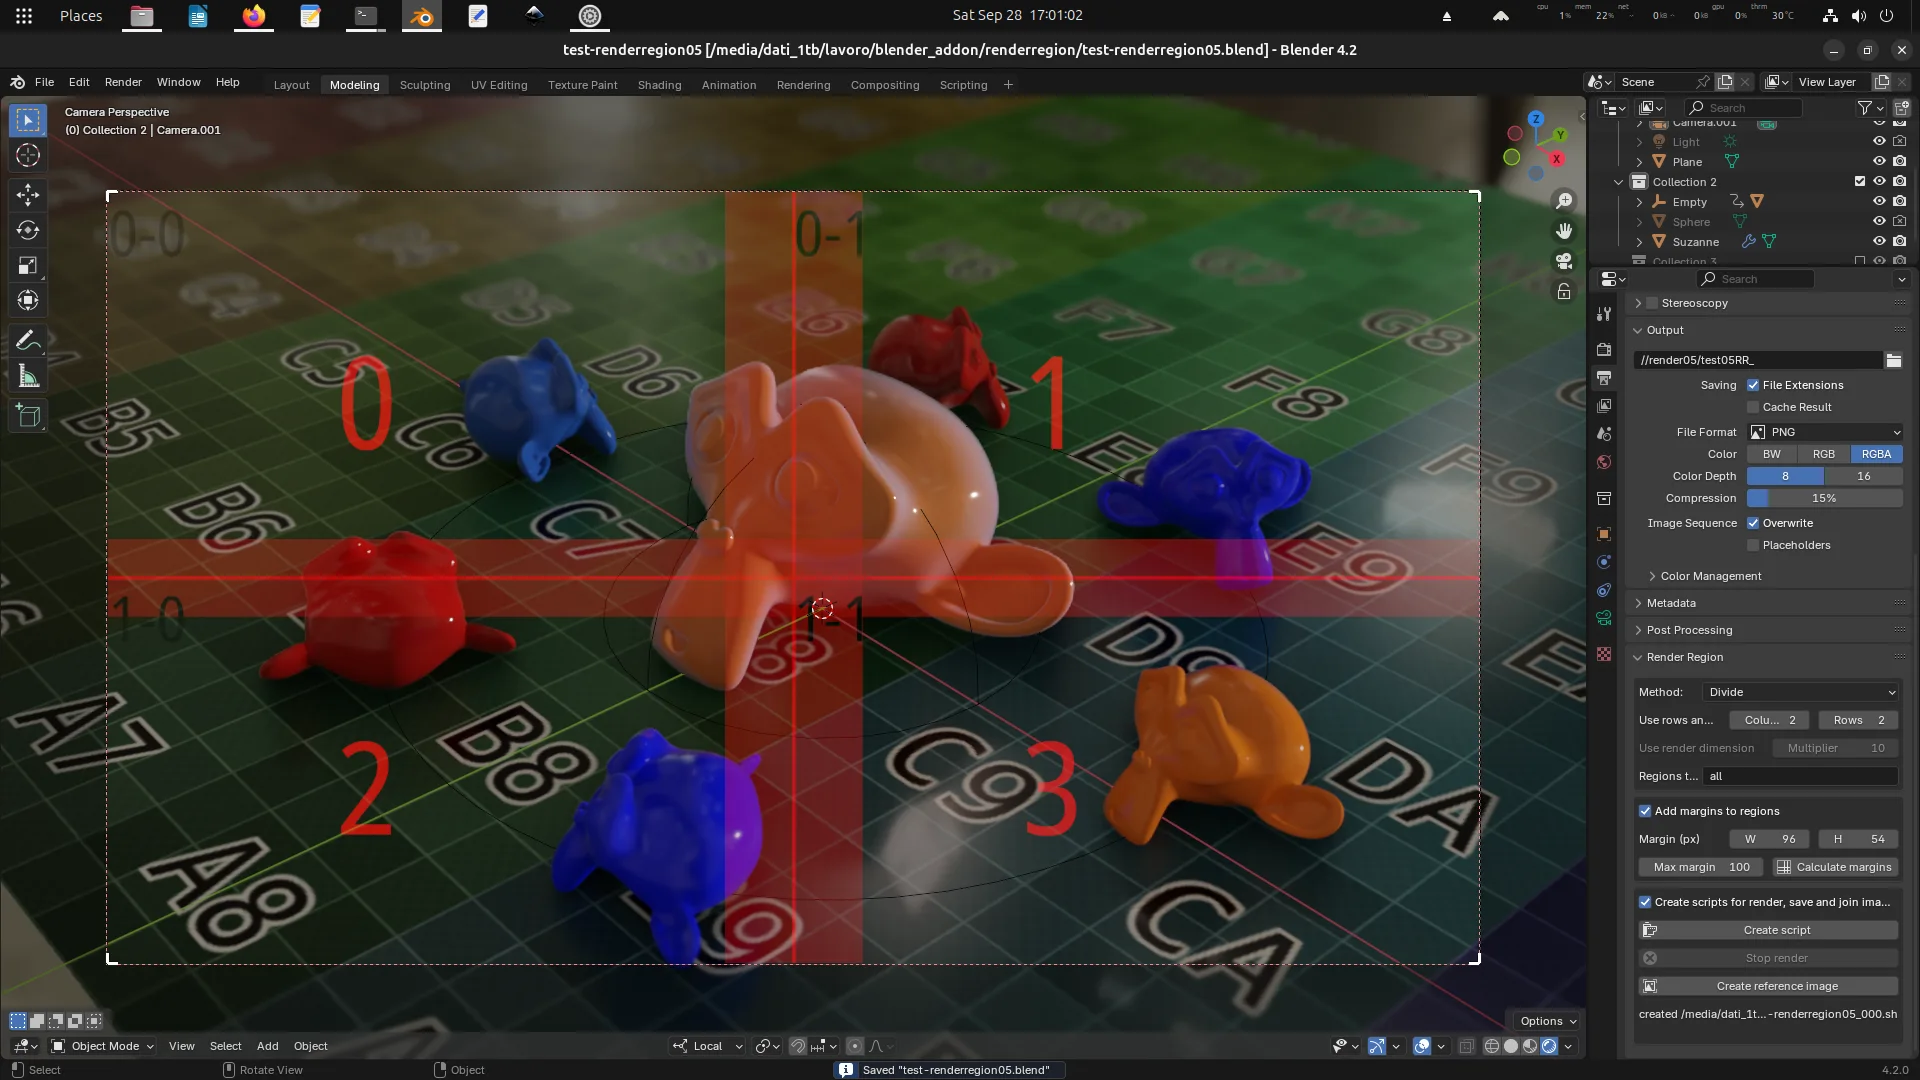
How the addon works
(the "Output path" field must be set correctly)
Bash and Python script
This addon is set by default to create scripts, to launch the render from the terminal.
Selecting "Create bash and python script" the "render region" button write a script, for launch the renders, (.sh bash script in Linux and MacOS, .bat batch script in Windows), and a python script, for merging all images, in the output folder.
The bash script launches renders of the selected regions, creating a temp python script for set the region to render. In the script there are commands for all rendering; the regions not to be rendered are commented out. At the end of the script is the command to run the python script. If you do not want to start the process of merging all the renderings, you must comment out the line with the python command:
- in .bat it will be: "::python xxxx.py"
- in .sh: "#python xxxx.py";
The python script crops (if overlap margins have been set) and merges all regions to get the final image.
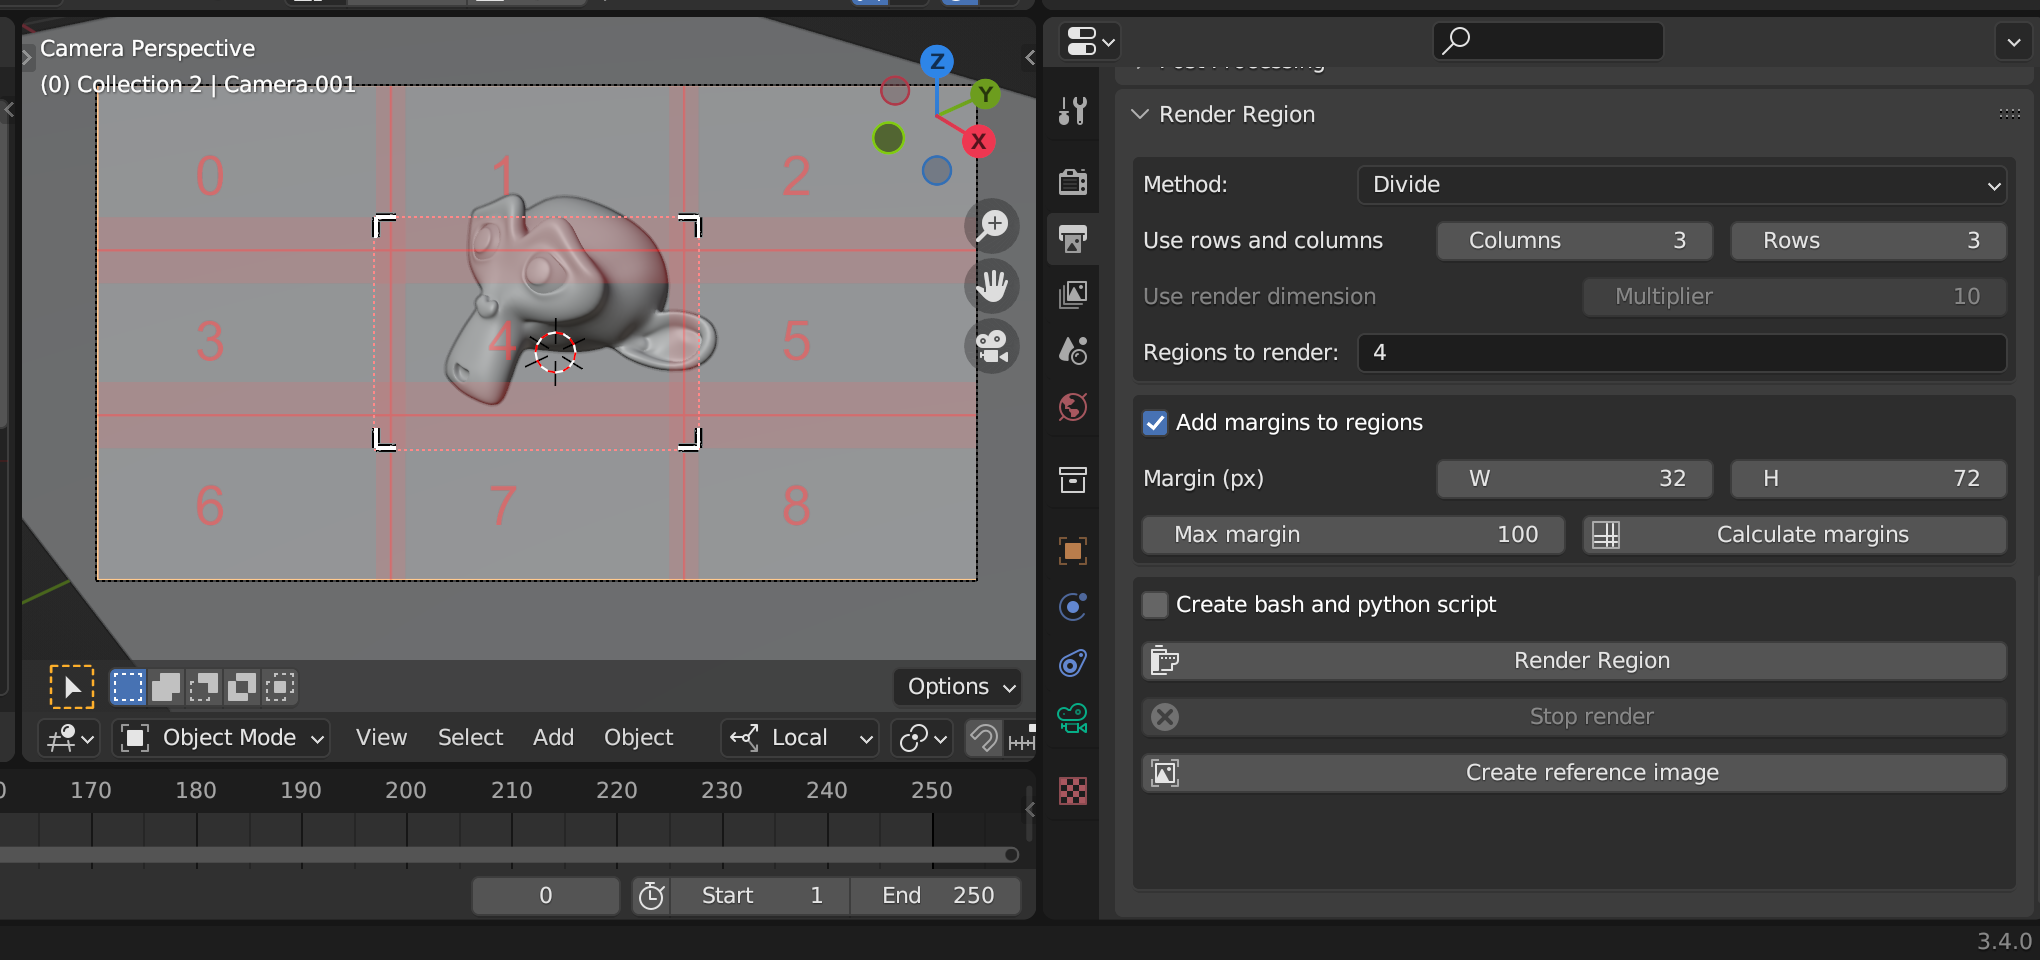
There are two methods: Divide and Multiply
Divide
The render is divided into regions according to the values indicated in the "Columns" and "Rows" fields. "Columns" indicates how many parts the width of the render is divided into, while "Rows" indicates the division of the height. The "regions to render" field indicate the regions to render.
For example:
- render set to 1920 x 1080 resolution (Format panel)
- output as PNG , with path //render/testRR_ (Output panel)
- in Render Region:
-- Method: Divide -- "Columns": 2 and "Rows": 3 -- regions to render: all
- click on the "Render Region" button:
- 6 images will be rendered and saved, in the output path, each 960x360 pixel (1920/2 and 1080/3).
- Their name indicates the region, counting from 0, left to right, top to bottom:
- testRR_[frame-number]_2x3_0_0.png it is the first region of the first row, the upper left region, the first rendered;
- testRR_[frame-number]_2x3_0_1.png first row, second region;
- testRR_[frame-number]_2x3_1_0.png second row, first region;
- ...
- testRR_[frame-number]_2x3_2_1.png: third row, second region, the bottom right region, the last.
- By merging the rendered images, you get the final image, 1920x1080.
- If a non-multiple number is indicated in "Columns" or "Rows" which would produce a dimension with decimals, the dimension of the various regions could be different due to rounding: in this case a message is displayed under the render buttons and in terminal.
Obviously it is better to avoid dividing the render into regions that would have non-integer numbers: 1920 in 2 regions (960):ok; 1920 in 3 regions (640):ok; 1920 in 7 regions (274.28...) no.
Multiply
The resolution, X and Y, is multiplied by the value indicated in "multipler" and the render is divided into regions, all with the original resolution Example:
- render set to 1920 x 1080 resolution (Format panel)
- output as PNG , with path //render/testRR_ (Output panel)
- in Render Region:
- Method: Multiply
- "Multiplier": 2
- regions to render: all
- click on the "Render Region" button:
- 4 images (2x2) will be rendered and saved, in the output path, each 1920x1080;
- in their name the relative region is indicated, counting from 0, from left to right, from top to bottom:
- testRR_[frame-number]_2x2_0_0.png this is the first region of the first row, so the top left, the first;
- testRR_[frame-number]_2x2_0_1.png first row, second region;
- testRR_[frame-number]_2x2_1_0.png second row, first region;
- testRR_[frame-number]_2x2_1_1.png second row, second region, bottom right, last.
- By merging the rendered images, you get the final image, 3840x2160.
Margins
This addon can be used with both Cycles and Eevee, but with Cycles there are problems using "Denoise" (Tab Render Properties > Sampling panel > Render - Denoise check): the "denoise" produces artifacts along the edges of the image, usually only for single pixels along the edges: by merging the images these artifacts will be clearly visible as they are all close and aligned. Other possible problems during merging can be given by effects in compositor, such as the "glare" which adds a halo around the brightest pixels: if these pixels are located near the edge of the region the effect will add the halo which may be larger than the edge distance and therefore be cut off. Combining the images you will see the halo cut out.
To fix this problem, the regions need to be enlarged by adding a margin which will then be cropped before merging the images.
Since the regions are calculated in a relative way and not in pixels, it is difficult to find a value for the margin compatible with the render size, because you have to avoid rounding problems that would affect the render size.
The button "Calculate Margins" finds the largest margin, starting from the value in "Max Margin" going backwards, which generates values with fewer decimals, safer.
The first best values found are written in the "w" and "h" fields. Any other values are reported in the terminal.
If no safe values are found, 0 is returned. In this case you need to change the rendering size, or the number of regions, or increase the "Max Margin" value.
You can choose the value of the margins without calculating it with the "Calculate margins" button, but rounding errors will be possible.
Create Reference Image
The "Create Reference Image" button generates a reference image; region borders are drawn with red lines, and margins (or overlapping areas) with semi-transparent areas. All regions are numbered.
File Output Node in Compositor
If the scene uses the compositor and there are "file output" nodes, the script will modify the names of each slot by adding the indication of the region they belong to. For example:
- render region set in 3 columns and 2 rows
- there is an File Output Node that has the file name "comp2_"
this name will be changed to "comp2_3x2_0_0" for the first render, "comp2_3x2_0_1" for the second render, and so on. The python script that merges all the renders should also merge the renders from the File Output Node.
Required software and OpenEXR Multilayer compatibility
The main goal is to create scripts to launch the render from the terminal, but it is also possible to render from the addon, inside Blender, although in this way it cannot automate the merging of the regions.
To launch the render from the terminal, this addon writes two scripts, one [project name][frame number].sh/.bat to launch the renders of the individual regions one after the other, and a python script [project name][frame number].py to merge the renders into a single image.
The first script launch Blender without a graphical interface to obtain the renders, the second join the images and does not use blender.
The python script that merges the images tries to load two modules: OpenImageIO and PIL;
- if it finds OpenImageIO it gives precedence to this module and manages to merge correctly even the "OpenEXR Multilayer" images, also from the tests done it seems to be the fastest method;
- if it does not find OpenImageIO it tries with PIL, which is quite fast but does not support "OpenEXR Multilayer" images, generating an error or a black image;
- if it does not find either of the two modules it tries with ImageMagick, which is slower and also does not support "OpenEXR Multilayer" images.
So on the system where the scripts will be launched, if you want to automatically merge the regions, at least one of the three software must be installed: either the OpenImageIO python module, or the Pillow python module, or the ImageMagick program.
But if you want to use the "OpenEXR Multilayer" format, the OpenImageIO python module must be installed.
The installation of these software is not managed by this addon, also because the system on which the scripts will be launched may not be the one that generated them, and forcing the installation of python modules does not seem an acceptable practice to me.
For installation, please refer to the software sites:
OpenImageIO, install
Installation might be a little complicated for Windows, for ubuntu you need a simple:
sudo apt install -y python3-openimageio
pip install pillow
- ImageMagick, instruction for download.\
To handle very large images, or if memory or disk have limits, you can edit your policy.xml to remove those limits.
example for Linux:
sudo nano /etc/ImageMagick-6/policy.xml
and change value for:
  <policy domain="resource" name="memory" value="2GiB"/>
  <policy domain="resource" name="area" value="1GiB"/>
  <policy domain="resource" name="disk" value="2GiB"/>
Values
- Method: Divide or Multiply: the method used for create region
- Columns: Only for method "Divide", number of columns, how much the width of the image is divided
- Rows: Only for method "Divide", number of rows, how much the height of the image is divided
- Multiplier: Only for method "Multiply", multiplier for render dimension, or number of tiles
- Regions to render: which regions to render, possible values:
- 'all': render all the regions;
- n (number): only render the n region (counting by row, from 0, top to bottom, left to right);
- n,x,y,z: only the region n, x, y and z;
- n-z: render region from n to z
- Add Margins to regions: add margins to render dimension, only to the inner edges of regions
- W: value, in pixels, for the margin to add to the width of the region
- H: value, in pixels, for the margin to add to the height of the region
- Max margin: value from which the margin calculation starts, going backwards
- Calculate margins: starts the margin calculation; if acceptable values are found, the best ones are written in the "W" and "H" fields, and are all displayed in the terminal
- Create bash and python script: create, in output location, a bash or batch script (.sh for Linux and MacOS, .bat for Windows) for launch the render process from command line, and create a python script with the procedure for create the final image using imagemagick (convert -crop and convert -+append)
- Render region: render the regions indicated in "Regions to render" and save it in the output folder (Output properties > Output > Output path).
If Compositor is activated and there are "File output"nodes, the file name will be changed according to the name assigned to the region.
License
Control Render Region is distributed under the terms of the GNU General Public License, version 3
What's New
1.0.8 March 23rd, 2025
correct bugs