 Object Utility Nodes

Welcome to Object Utility Nodes Extension
The Object Utility Nodes Extension is a versatile toolkit includes a variety of nodes for diverse purposes.
You'll find some simple and one complex node which can be used to set material colors for different objects with harmonic colors which is described for example here.
What's inside the Extension?
This project consists of three main modules:
1. ccn_utils
This module provides a framework to create custom node editors and integrate node classes. This is used to create the Custom Node Editor, the menu entries and the linking of the nodes into it.
2. Object Utility Nodes
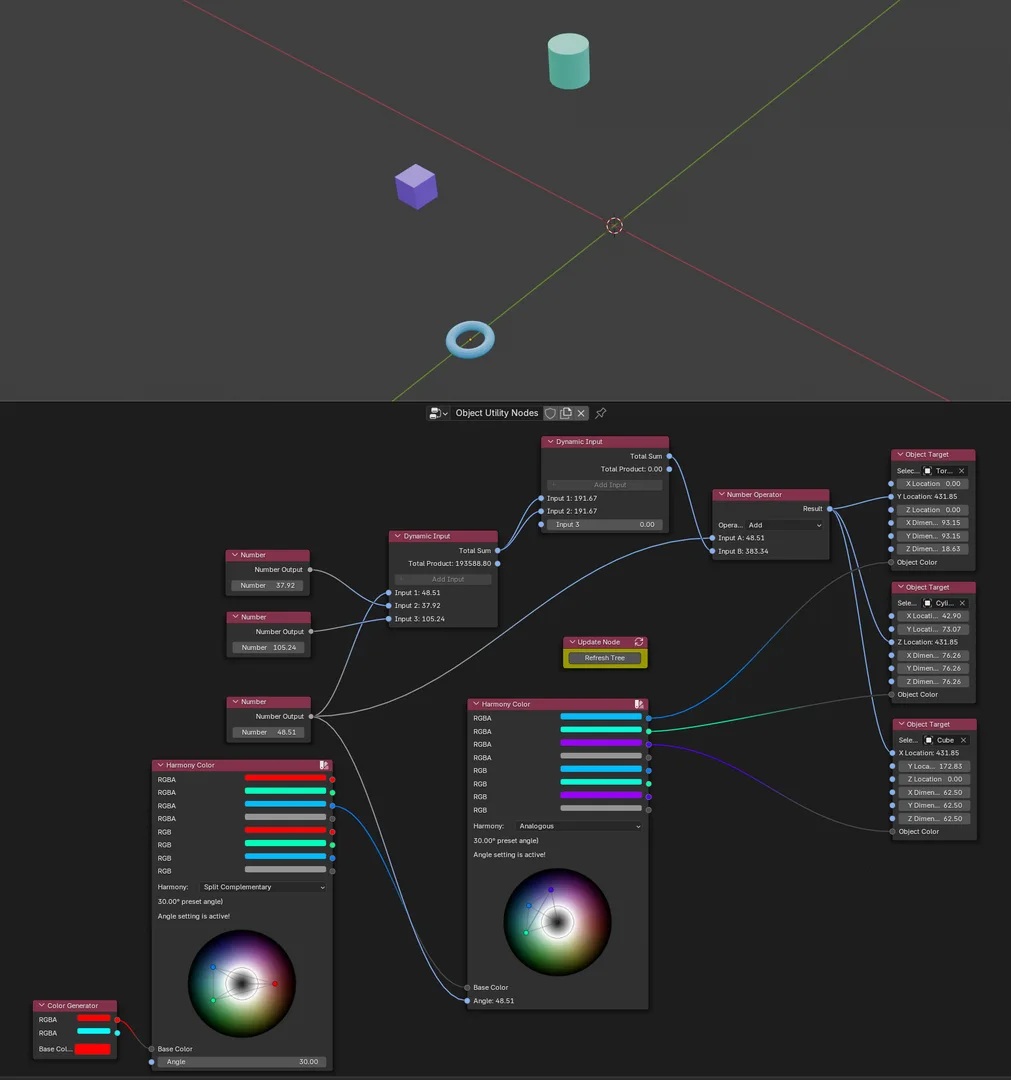
The Object Utility Nodes module introduces a collection of general-purpose, easy-to-use nodes designed for practical workflows. These nodes serve as useful tools for getting values from an existing object in the scene, for supplying calculations, numbers and colors and to assign it back to the objects in the scene (which don't need to be the same).
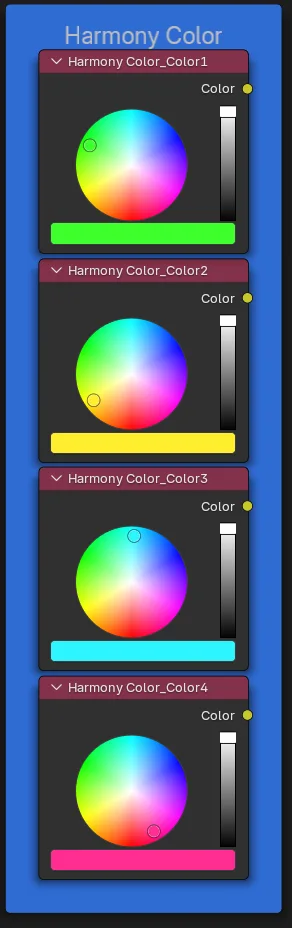
3. Color Harmony Node
The Color Harmony Nodes module offers advanced functionality for generating and exploring harmonic color schemes. Perfect for artists and developers seeking inspiration in color theory. You can use it to select a base color, a harmony type and you will get up to four output colors which you can assign to target objects. The color wheel is shown directly in the node and lines and color markers are shown on the color wheel for orientation.
It was made from an idea explained here, where I created this as a "N" menu sidepanel but more to show if it is possible in general but this addon there has very limited use other than to extend it with own programming (it creates the colors but the addon had no way to assign them anywhere).
Reprogrammed that here as node which allows you to assign the generated colors to an object in the scene as material. And of course you can use more than one harmonic color wheel also and use their output as input for another harmonic color node for example.
In the next sections, you'll find step-by-step guides on installing and utilizing this extension effectively.
Let’s get started!
Details about the Modules
1. ccn_utils
Inspired by the idea of simplifying custom node creation, ccn_utils was developed to address these challenges and make custom node editors accessible using Python. Here’s what it offers:
- Easy setup of custom node editors.
- Effortless integration of custom node classes into the editor.
- A convenient way to create node categories and assign node classes to them using a simple dictionary-based structure.
But this is not meant to be a replacement for the Blender API or meant to be an official extension of it, it's just used here in this extension to make the rest of the code easier. You can use it in your own projects if you want but you need to adjust it in case that the Blender API ever changes.
2. Object Utility Nodes
The Object Utility Nodes module provides a collection of versatile and general-purpose nodes tailored for common Blender workflows. These are mainly helper nodes to have a way of assigning values from or to objects in the 3D scene and to provide or get values using the Harmony Color Node. This module includes nodes that handle basic operations, such as selecting objects, manipulating numeric values, generating colors, and managing outputs.
What’s included?
This module contains various node classes grouped into categories inside the "Add" menu of the node editor, making it easy to build node-based workflows for a range of tasks. Here are the key features:
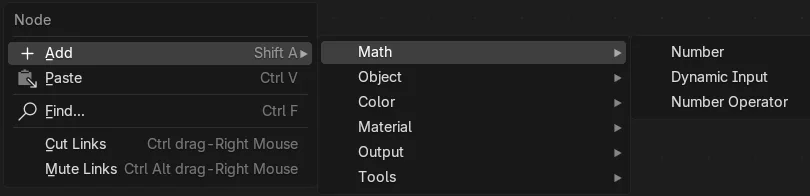
- Math Nodes: Perform numeric operations and calculations.
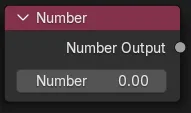
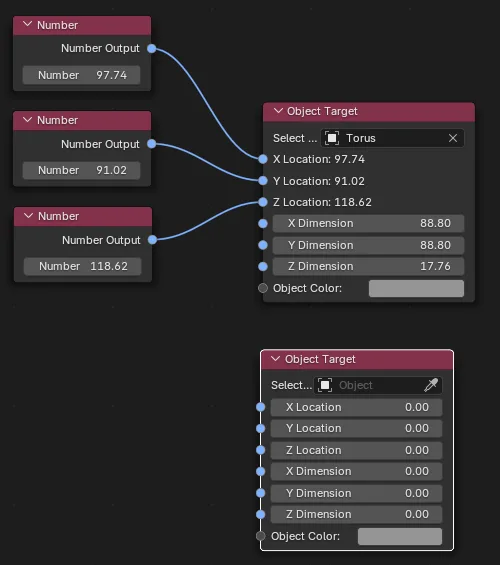
- Number Node: The simplest node of all: You can enter a float number and use it as output.

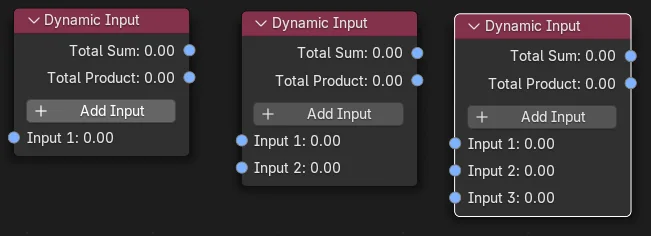
- Dynamic Input Node: Also a very simple node which adds all input float values or multiplies them, as two output sockets. The special thing here is that you have a button which allows you to add more inputs. The number of input sockets can be increased, but not reduced. You would need to remove it and reinsert it if you need less input sockets.

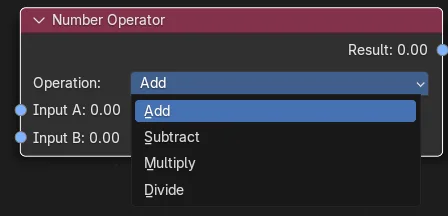
- Number Operator Node: This is for basic math operations for adding, subtracting, multiplying and dividing input numbers and output the result as one output socket.

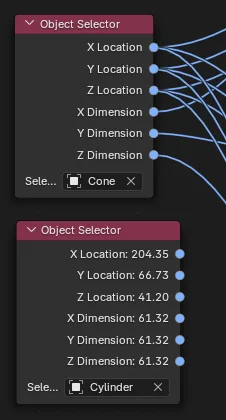
- Object Nodes: Select objects and define object targets for interactions.
- These nodes are to operate with the displayed 3D scene. You can select an object and get some base values like position or scaling and the target node can be used to assign these values and additionally a color to a target object in the scene. Material will be automatically created if it doesn't exist. (Don't forget to switch the view in "Viewport Shading" (right upper corner of the 3D editor) to "Material Preview" to see the colors.)
- Object Selector Node:
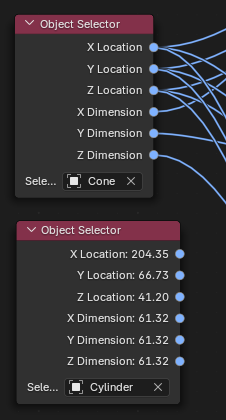
- Object Target Node:

- Color Nodes: Generate and manipulate colors dynamically.
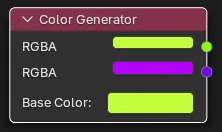
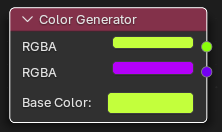
- Color Generator Node: This was originally a dummy to create color values before I added the second one (see below). I left it here so you can see how you can reach color manipulations without complex code. It creates a complementary color for a given base color and outputs both.
- Output Nodes: Manage outputs effectively in your node editor.
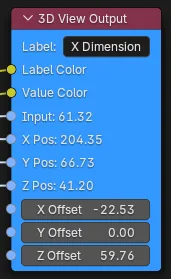
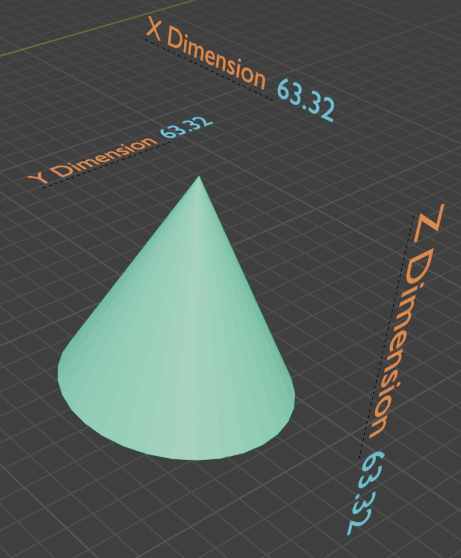
- 3D View Output Node: Was created to have a quick way to see a value result with a label as inserted text and result value as text in the 3D scene. Label and result value both have colors also available as input sockets. Together with the Number Operator Node above you can i.e. create a simple calculator with it with direct updates in the 3D scene if you change the input numbers. It has X/Y/Z-Positions which can be linked to an object's X/Y/Z-Positions and additionally Offsets for X/Y/Z. You can use this to create i.e. a measurement label to an object. If you then switch the object in the object selector node the complete measurement labels you linked to it will "jump" to the new object - with the values updated of course.

- Utility Tools: Includes nodes for updates and workflow management.
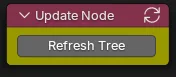
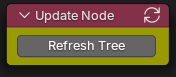
- Update Node: This contains a "Refresh Tree" button. As it is very difficult in Blender to provide automatic updating when changing values in the nodes (at least for me...) I added a simple button which starts a complete update process for all inserted nodes. So if anything is not updated, try to click the button. I'm sure there will be better ways of updating nodes, but feel free to integrate it in your code.. :)
3. Harmony Color Node
The Harmony Color Node is a versatile tool designed to generate harmonic color palettes and creative color designs. This node provides an intuitive and flexible way to dynamically manipulate colors in Blender workflows, producing visually appealing results.
What does the Harmony Color Node offer?
- Harmonic color combinations: Generate colors based on different color harmonies such as complementary colors, triads, and analogous palettes.
- Dynamic control: Easily manipulate the base color, angle, and color space for flexible adjustments.
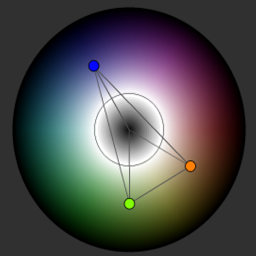
- Interactive visualization: Visualize the generated colors directly in the node as a color wheel with color markers, angle guides, and help lines. These visual aids make it easier to grasp the relationships between the colors.
- Direct application: Use the harmonized colors as material color values for objects in the 3D scene.
Features in detail
Set a base color:
- Choose a base color in either the RGB or HSV color space. This serves as the starting point for generating harmonic colors.
- Use an additional node, like the Color Generator node, to externally control or dynamically adjust the base color.
Select a color harmony:
- Complementary: A color and its opposite on the color wheel
- Split Complementary: Two colors adjacent to the complementary color for more variety
- Analogous: Colors adjacent to each other on the color wheel for a harmonious look
- Triadic: Three evenly spaced colors on the color wheel
- Tetradic Square: Four colors evenly spaced, forming a square in the color wheel
- Tetradic Angle: Four colors forming a rectangle on the color wheel, offering subtle balance
- Monochromatic: Variations of a single color for a clean and cohesive aesthetic
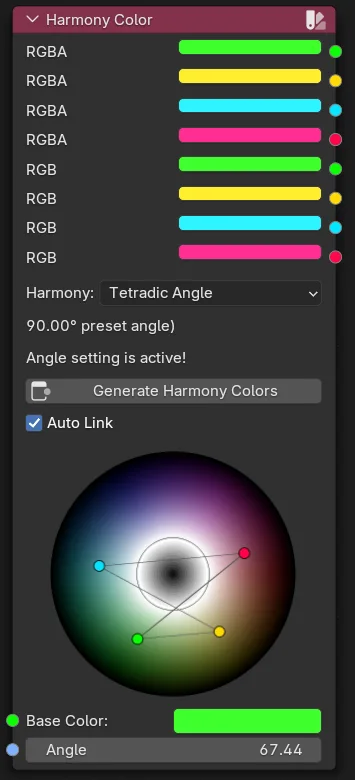
Sample for Tetraedic Angle:

Dynamic updates:
- Changing the base color, harmony mode, or angle will immediately recalculate the colors, enabling seamless previews and adjustments in real-time.
Angle customization:
- For certain harmony types, the angle can be individually adjusted to fine-tune the output. The default angle values are displayed as visual aids in the node, and adjustments can be made either manually or via linked nodes.
- When a new harmony type is selected, the displayed preset angle will be used instead of the angle in the angle property. If you want to use the angle from the property you need to change the angle value at least one time. This is to show the correct result of the chosen color harmony - because always using the value from the property would create the same result for different harmony types as depending on the chosen angle you can make i.e. an analogous harmony from a triadic one and so on.
Inputs and Outputs
Inputs:
- Base Color: The primary color used as the basis for calculations.
- Mode Selection: Choose between various harmony modes.
- Angle: (Optional) Input for adjusting the custom angle dynamically via a linked node.
Outputs:
- Harmonized Colors: Outputs the generated color combinations as RGBA and additionally as RGB values (fixed Alpha of 1.0), ready for use in material designs, texture creation, or procedural workflows.
- The first output color is always the chosen base color
- Depending on the chosen harmony 2, 3 or 4 colors are generated. If you choose for example "complementary" as harmony, output 1 is the base color and output 2 the complementary color. Colors 3 and 4 remains unchanged so if a previous harmony choice has created a color here you can still use it as output but the color has nothing to do with the harmony "complementary" here.
** Additional functions: **
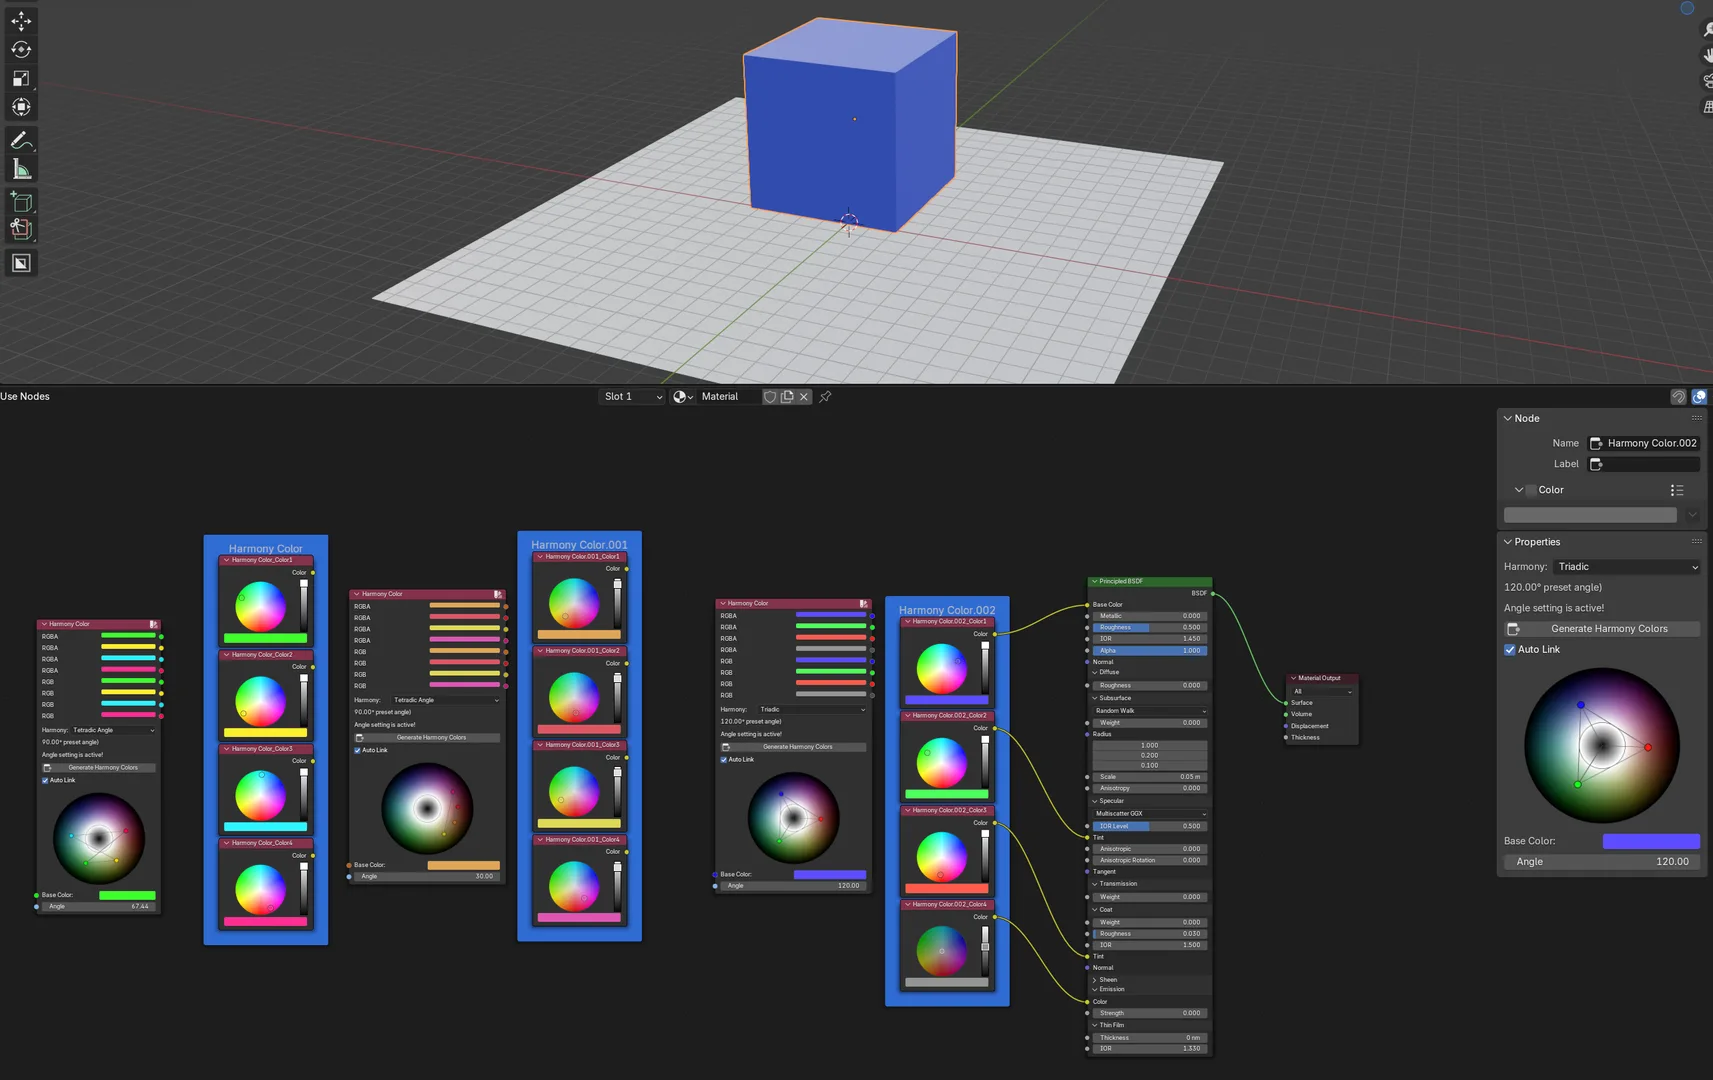
- This as the only node here can be inserted into the standard Shader Node Editor.
- As Blender seems not to be able to use the Python output as input for a Shader Node color an additional button "Generate Harmony Colors" is available. This creates four standard Shader RGB Nodes using the four harmony colors and groups them into a frame.
- If you click "Auto Link" the four colors will be linked to four settings of the material, beginning with the Base Color. Others are Specular, Coat and Emission. Without "Auto Link" checked you can recreate the colors clicking the button again so you can remove the links you do not want and adjust the colors without relinking them again. Of course you can use the colors after inserting wherever you want in the Shader Node Editor as they are native Blender nodes.

Use Cases
- Material design: Quickly create harmonious color palettes for shaders and materials.
- Graphic design: Develop color schemes for animations, promotional graphics, or rendered scenes.
- Visualization: Show harmonic relationships directly in the node editor and visualize them in the 3D scene for better understanding.
Tips and Tricks
- Link a Color Generator to the Base Color input for a more organized node layout, keeping the Harmony Color Node focused on calculations. When you open the color dialog it will not overlap the color wheel and you can directly see the result.
- For advanced workflows, connect additional nodes to the Angle input to dynamically adjust the relationships between colors.
- Of course more than one node is always possible, so you can create two or more harmony color nodes and use their output as base color input for another. With that you can mix harmonies like you want.
- Using the object target node you can also change more than one object, for example by creating 4 objects and assign each one color of the harmony color output. You can add a number node and assign it at the same time to the angle input and also to a dimension or position input of the object target so if you change the number an object can move/resize and at the same time change it's harmony colors.
What's New
1.0.1 April 27th, 2025
Added some new features:
Harmony Color Node
- has separated outputs for RGB and RGBA
- has the possibility to be added to the standard Shader Node Editor
- has there two new functions: A button to create standard ShaderRGB nodes from the harmony colors and a "auto link" checkbox
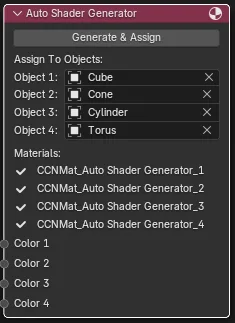
New: Auto Sahder Generator Node to add materials for up to 4 objects using the input color sockets (i.e. from the Harmony Color outputs)
Improved the output of values and updates by using own sockets for input and output
Improved 3D View Node
- now had additional X/Y/Z inputs to display the output wherever you want
- has X/Y/Z offset values to move it away from the coordinates
- now uses an Empty object as parent so if you resize/reposition/rotate the parent object the relative positions between label and value keeps the same
some minor bug fixes and improvements